The object-oriented way to script Maya. PyMEL basics, scene operations, attribute manipulation, and a batch renamer tool built from scratch.
PyMEL is a Python wrapper for Maya that replaces the string-based maya.cmds module with a true object-oriented interface. Instead of passing node names as strings to every function, PyMEL gives you Python objects with methods and properties - making your code cleaner, more readable, and far less error-prone.
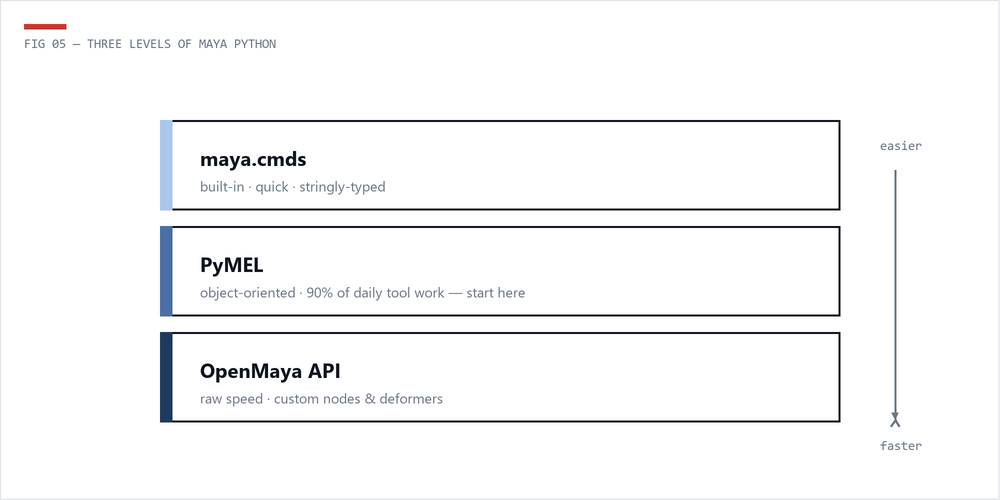
The core difference is how you interact with Maya nodes. With maya.cmds, everything is a string. You pass a string name to a function, and it returns a string (or list of strings). If an object gets renamed, your string reference breaks silently. PyMEL wraps every node in a Python object that tracks the node internally via Maya's underlying UUID - so references survive renames.
PyMEL ships with Maya - no installation required. Just import pymel.core as pm in the Script Editor or your tool module. Key advantages of PyMEL over maya.cmds:
PyMEL is included with every Maya installation. You can start using it immediately in Maya's Script Editor or in external modules loaded by Maya.
import pymel.core as pm

# Verify PyMEL is working
print(pm.about(version=True))

# The first import can be slow (~2-5 seconds) as PyMEL
# builds its internal database. Subsequent imports are instant.
PyMEL's first import in a Maya session is slow because it parses Maya's entire command documentation to build its API. For production tools, import PyMEL at the module level (not inside functions) to avoid repeated delays.
Let's start with the most common operations: creating, selecting, and transforming objects.
import pymel.core as pm

# Create primitives - returns a tuple of (transform, shape)
cube_transform, cube_shape = pm.polyCube(name='hero_cube', width=2, height=2, depth=2)
sphere_transform, sphere_shape = pm.polySphere(name='hero_sphere', radius=1.5)
plane_transform, plane_shape = pm.polyPlane(name='ground_plane', width=20, height=20,
 subdivisionWidth=10, subdivisionHeight=10)

# Create an empty group (transform node)
grp = pm.group(empty=True, name='asset_GRP')

# Create a locator
loc = pm.spaceLocator(name='target_LOC')

# Create a NURBS circle (useful for rig controls)
ctrl, _ = pm.circle(name='main_CTRL', normal=(0, 1, 0), radius=3)
import pymel.core as pm

# Select objects
pm.select('hero_cube', 'hero_sphere')

# Get current selection as PyNode objects
selection = pm.selected()
for node in selection:
 print(f'{node.name()} - type: {node.type()}')

# List all mesh transforms in the scene
all_meshes = pm.ls(type='mesh')
all_mesh_transforms = [mesh.getParent() for mesh in all_meshes]
print(f'Found {len(all_mesh_transforms)} meshes in scene')

# Find objects by wildcard pattern
ctrls = pm.ls('*_CTRL')
jnts = pm.ls('*_JNT')
grps = pm.ls('*_GRP')import pymel.core as pm
cube = pm.PyNode('hero_cube')
# Set translation
cube.setTranslation([5, 0, 3], space='world')
# Set rotation (in degrees)
cube.setRotation([0, 45, 0])
# Set scale
cube.setScale([1.5, 1.5, 1.5])
# Read back transform values
pos = cube.getTranslation(space='world')
rot = cube.getRotation()
scl = cube.getScale()
print(f'Position: {pos}')
print(f'Rotation: {rot}')
print(f'Scale: {scl}')
# Move relative to current position
cube.move(0, 2, 0, relative=True)
# Freeze transformations
pm.makeIdentity(cube, apply=True, translate=True, rotate=True, scale=True)
# Center pivot
pm.xform(cube, centerPivots=True)PyMEL's attribute system is one of its biggest strengths. You can access, modify, and connect attributes using clean Python syntax.
import pymel.core as pm

cube = pm.PyNode('hero_cube')

# Dot notation for attribute access
tx = cube.translateX.get()
cube.translateX.set(10.0)

# Using attr() for dynamic attribute names
attr_name = 'rotateY'
cube.attr(attr_name).set(45.0)

# Check if an attribute exists
if cube.hasAttr('customWeight'):
 print(cube.customWeight.get())

# Add a custom attribute
if not cube.hasAttr('rigScale'):
 pm.addAttr(cube, longName='rigScale', attributeType='float',
 defaultValue=1.0, minValue=0.01, maxValue=100.0, keyable=True)

cube.rigScale.set(2.5)

# Lock and hide attributes
cube.scaleX.lock()
cube.scaleY.lock()
cube.scaleZ.lock()
cube.visibility.set(keyable=False, channelBox=False)import pymel.core as pm
driver = pm.PyNode('main_CTRL')
driven = pm.PyNode('hero_cube')
# Connect attributes using the >> operator
driver.translateX >> driven.translateX
# Connect using connectAttr
pm.connectAttr(driver.rotateY, driven.rotateY)
# Disconnect an attribute
driver.translateX // driven.translateX # PyMEL disconnect operator
# Create a multiply-divide node for scaled connections
mult = pm.createNode('multiplyDivide', name='scale_mult')
driver.rigScale >> mult.input1X
mult.input2X.set(0.5)
mult.outputX >> driven.scaleX
mult.outputX >> driven.scaleY
mult.outputX >> driven.scaleZ
# List all connections on a node
connections = cube.listConnections(plugs=True, connections=True)
for src, dst in connections:
print(f'{src} -> {dst}')The >> and // operators are PyMEL-specific shorthand for connectAttr and disconnectAttr. They make connection code much more readable, especially when wiring up complex node graphs.
You'll audit scenes constantly - naming violations, orphan nodes, broken hierarchies, and the eternal "can you make me a report?" request.
import pymel.core as pm

def audit_scene():
 """Run basic scene health checks and print a report."""
 report = []

 # Check for unnamed nodes (default names)
 default_names = []
 for mesh in pm.ls(type='mesh'):
 transform = mesh.getParent()
 if transform.name().startswith('pCube') or \
 transform.name().startswith('pSphere') or \
 transform.name().startswith('pPlane'):
 default_names.append(transform.name())

 if default_names:
 report.append(f' {len(default_names)} objects with default names:')
 for name in default_names:
 report.append(f' - {name}')

 # Check for non-frozen transforms
 unfrozen = []
 for transform in pm.ls(type='transform'):
 shapes = transform.getShapes()
 if not shapes:
 continue
 rot = transform.getRotation()
 scl = transform.getScale()
 if any(abs(r) > 0.001 for r in rot) or any(abs(s - 1) > 0.001 for s in scl):
 unfrozen.append(transform.name())

 if unfrozen:
 report.append(f' {len(unfrozen)} objects with non-frozen transforms:')
 for name in unfrozen:
 report.append(f' - {name}')

 # Count node types
 meshes = pm.ls(type='mesh')
 joints = pm.ls(type='joint')
 curves = pm.ls(type='nurbsCurve')
 report.append(f' Scene stats: {len(meshes)} meshes, {len(joints)} joints, {len(curves)} curves')

 # Check for empty groups
 empty_groups = []
 for grp in pm.ls(type='transform'):
 if not grp.getShapes() and not grp.getChildren():
 empty_groups.append(grp.name())

 if empty_groups:
 report.append(f' {len(empty_groups)} empty groups found')

 # Print the report
 print('\n'.join(report))
 return report

audit_scene()import pymel.core as pm
def get_mesh_info(node_name):
"""Return detailed mesh information for a given node."""
node = pm.PyNode(node_name)
shape = node.getShape() if node.type() == 'transform' else node
if not shape or shape.type() != 'mesh':
print(f'{node_name} is not a mesh')
return None
info = {
'name': node.name(),
'vertex_count': shape.numVertices(),
'face_count': shape.numFaces(),
'edge_count': shape.numEdges(),
'uv_set_count': len(shape.getUVSetNames()),
'uv_sets': shape.getUVSetNames(),
'bounding_box': node.getBoundingBox(),
'has_history': len(node.history()) > 1,
}
bb = info['bounding_box']
print(f'Mesh: {info["name"]}')
print(f' Verts: {info["vertex_count"]}, Faces: {info["face_count"]}, Edges: {info["edge_count"]}')
print(f' UV Sets: {info["uv_sets"]}')
print(f' Bounding Box: {bb.min()} to {bb.max()}')
print(f' Has History: {info["has_history"]}')
return infoA batch renamer is one of the most useful studio tools. Let's build one that supports prefix/suffix, search-and-replace, and sequential numbering.
import pymel.core as pm

def batch_rename(nodes=None, prefix='', suffix='', search='', replace='',
 rename_pattern='', start_number=1, padding=2):
 """
 Batch rename selected or specified nodes.

 Args:
 nodes: List of nodes to rename. Uses selection if None.
 prefix: String to add before the name.
 suffix: String to add after the name.
 search: Substring to find in existing names.
 replace: Substring to replace 'search' with.
 rename_pattern: Full rename pattern using # for numbers.
 e.g., 'arm_##_JNT' produces arm_01_JNT, arm_02_JNT...
 start_number: Starting number for sequential rename.
 padding: Zero-padding width for numbers.

 Returns:
 List of (old_name, new_name) tuples.
 """
 if nodes is None:
 nodes = pm.selected()

 if not nodes:
 pm.warning('No objects selected for renaming.')
 return []

 results = []

 # Process in reverse to avoid child rename issues
 for i, node in enumerate(nodes):
 old_name = node.name().split('|')[-1] # short name only
 new_name = old_name

 # Option 1: Full pattern rename with numbering
 if rename_pattern:
 num_str = str(start_number + i).zfill(padding)
 new_name = rename_pattern.replace('#' * padding, num_str)
 # Fallback: replace any sequence of #
 if '#' in new_name:
 hash_count = new_name.count('#')
 num_str = str(start_number + i).zfill(hash_count)
 new_name = new_name.replace('#' * hash_count, num_str)
 else:
 # Option 2: Search and replace
 if search:
 new_name = new_name.replace(search, replace)

 # Option 3: Add prefix/suffix
 if prefix:
 new_name = prefix + new_name
 if suffix:
 new_name = new_name + suffix

 # Rename the node
 node.rename(new_name)
 results.append((old_name, node.name()))
 print(f' {old_name} -> {node.name()}')

 print(f'\nRenamed {len(results)} objects.')
 return results

# Example usage:

# Add a prefix to all selected objects
# batch_rename(prefix='L_')

# Search and replace in names
# batch_rename(search='left', replace='right')

# Sequential rename with pattern
# batch_rename(rename_pattern='spine_##_JNT', padding=2)

# Rename specific nodes with suffix
# joints = pm.ls(type='joint')
# batch_rename(nodes=joints, suffix='_JNT')When renaming nodes that exist in a hierarchy, always rename children before parents. If you rename a parent first, the full path to children changes, which can break string-based references. PyMEL's node objects handle this gracefully, but it's good practice to be aware of it.
Here's a side-by-side comparison showing how the same tasks look in both modules:
# --- maya.cmds ---
import maya.cmds as cmds

cube = cmds.polyCube(name='test_cube')[0] # returns string
cmds.setAttr(cube + '.translateX', 10)
cmds.setAttr(cube + '.translateY', 5)
tx = cmds.getAttr(cube + '.translateX')
cmds.parent(cube, 'world_GRP')

# --- PyMEL ---
import pymel.core as pm

cube = pm.polyCube(name='test_cube')[0] # returns PyNode
cube.translateX.set(10)
cube.translateY.set(5)
tx = cube.translateX.get()
cube.setParent('world_GRP')# --- maya.cmds ---
import maya.cmds as cmds
driver = 'main_CTRL'
driven = 'test_cube'
# Check attribute, connect, list connections
if cmds.attributeQuery('customAttr', node=driver, exists=True):
val = cmds.getAttr(driver + '.customAttr')
cmds.connectAttr(driver + '.rotateY', driven + '.rotateY', force=True)
conns = cmds.listConnections(driven, plugs=True)
# --- PyMEL ---
import pymel.core as pm
driver = pm.PyNode('main_CTRL')
driven = pm.PyNode('test_cube')
# Check attribute, connect, list connections
if driver.hasAttr('customAttr'):
val = driver.customAttr.get()
driver.rotateY >> driven.rotateY
conns = driven.listConnections(plugs=True)# --- maya.cmds ---
import maya.cmds as cmds
for mesh in cmds.ls(type='mesh') or []:
transform = cmds.listRelatives(mesh, parent=True)[0]
vtx_count = cmds.polyEvaluate(transform, vertex=True)
world_pos = cmds.xform(transform, query=True, translation=True, worldSpace=True)
print(f'{transform}: {vtx_count} verts at {world_pos}')
# --- PyMEL ---
import pymel.core as pm
for mesh in pm.ls(type='mesh'):
transform = mesh.getParent()
vtx_count = mesh.numVertices()
world_pos = transform.getTranslation(space='world')
print(f'{transform}: {vtx_count} verts at {world_pos}')PyMEL is slightly slower than maya.cmds due to the object wrapping overhead. For most tools this is negligible, but if you're processing tens of thousands of nodes in a tight loop, consider using cmds for the hot path and PyMEL for everything else - or switch to the Python API for maximum performance.
Now that you're comfortable with PyMEL, explore the Maya Python API for low-level performance, or jump into Rigging with Python to apply these skills to character setup.