The Houdini habits that make node networks survive contact with production: loops, feedback, HDAs, TOPs/PDG, external data, and tidy graph hygiene.
This is the "how do I build Houdini work that other people can actually use?" page: loops, HDAs, batch jobs, data in, files out, and networks that don't become archaeological sites.
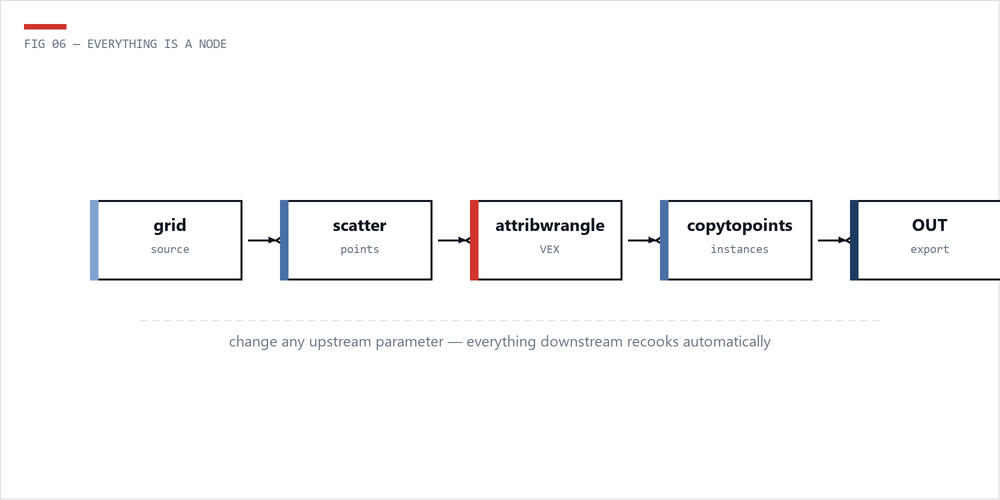
The big shift from Maya or Blender is that you stop making one result and start making the machine that makes results. Each node is an instruction. Change the input, change a parameter, swap a CSV, and the network should still know what to do.
The habits that make that work:
Before building a network, write out the steps in plain language: "For each building footprint -> extrude to random height -> add windows based on floor count -> assign material by zone." Then translate each step into a node or group of nodes.
Loops are where Houdini starts feeling like a superpower: run the same operation on every piece of geometry separately, or run a process on itself over and over until it looks right.
This is the "treat every chunk separately" loop. Use it when a pile of connected pieces needs individual scale, rotation, cleanup, naming, or export prep.
The usual setup:
// Pre-loop: assign unique piece IDs and random values
// Run this Wrangle BEFORE the for-each loop

// Give each piece a random scale and rotation
int piece = i@class;
float seed = float(piece) * 13.37;

f@rand_scale = fit01(rand(seed), 0.6, 1.4);
f@rand_rot = fit01(rand(seed + 1), -30, 30);
v@centroid = getbbox_center(0);
// Inside for-each loop: transform each piece independently
// This runs on each piece in isolation

vector center = getbbox_center(0);
float scale = f@rand_scale;
float rot_deg = f@rand_rot;

// Move to origin, scale, rotate, move back
@P -= center;
@P *= scale;

float angle = radians(rot_deg);
matrix3 m = ident();
rotate(m, angle, {0, 1, 0});
@P *= m;

@P += center;
Feedback loops feed the result of one pass back into the next pass. They're great for growth, relaxation, erosion-ish ideas, and any setup where "do it once" isn't enough.
// Feedback loop: iterative point relaxation
// Block Begin set to "Fetch Feedback", iterations = 20

// Average each point's position with its neighbors
int nbs[] = neighbours(0, @ptnum);
if(len(nbs) == 0) return;

vector avg = {0, 0, 0};
foreach(int nb; nbs) {
 avg += point(0, "P", nb);
}
avg /= float(len(nbs));

// Blend toward average (relaxation factor)
float blend = chf("relax_strength"); // 0.1-0.5 works well
@P = lerp(@P, avg, blend);Feedback loops cook in order. Iteration 12 needs iteration 11, so Houdini can't magically parallelize the whole thing. Keep the geometry light, or move heavy simulation-style work into a solver setup.
HDAs are how a node network becomes a tool instead of "that one scene file only Jamie understands." They get their own page because the details matter. The full HDA guide covers creation, parameter promotion, folders, ramps, conditional UI, button callbacks, safe edits, namespaces, versioning, and team distribution.
The short version: build the network around a clean OUT null, collapse it to a subnet, create a digital asset with a namespaced name like studio::wall_generator::1.0, expose only the controls artists need, and store the .hda in a shared version-controlled library. Good loops, good names, and tidy networks are what keep the inside maintainable.
TOPs, powered by PDG, are Houdini's batch brain. They turn frames, files, wedges, and export jobs into work items that can run locally or on a farm.
# Python Processor TOP - generate work items from file list
# Place this in a Python Processor node's "Generate" callback

import os

asset_dir = self.parm("asset_directory").eval()
extensions = (".bgeo.sc", ".obj", ".fbx")

for filename in os.listdir(asset_dir):
 if filename.endswith(extensions):
 item = item_holder.addWorkItem()
 filepath = os.path.join(asset_dir, filename)
 item.setStringAttrib("filepath", filepath)
 item.setStringAttrib("asset_name", os.path.splitext(filename)[0])
item.setIntAttrib("index", item_holder.numWorkItems() - 1)# Wedge setup with Python - generate parameter combinations
# In a Python Processor TOP
import itertools
noise_freqs = [0.5, 1.0, 2.0, 4.0]
seed_values = [0, 42, 99, 256]
subdivisions = [2, 3, 4]
for freq, seed, subdiv in itertools.product(noise_freqs, seed_values, subdivisions):
item = item_holder.addWorkItem()
item.setFloatAttrib("noise_freq", freq)
item.setIntAttrib("seed", seed)
item.setIntAttrib("subdivisions", subdiv)
label = f"freq{freq}_seed{seed}_sub{subdiv}"
item.setStringAttrib("wedge_label", label)Use the built-in Wedge TOP for simple sweeps. Reach for Python Processor TOPs when the logic gets real: reading databases, filtering file lists, calling APIs, or generating custom work items.
Big Houdini graphs go feral fast. These habits keep the network readable for the next person, including you after a weekend.
Network Boxes (select nodes -> Shift+O) are great for visual grouping when a subnet would be too heavy. They don't change scope, so they're low-drama. Label them clearly.
Production Houdini rarely lives alone. It reads CSVs, JSON configs, databases, build outputs, and weird little files from other tools. Here is the basic pattern for getting that data into geometry.
# Python SOP - read CSV and create points from coordinates
import csv

node = hou.pwd()
geo = node.geometry()
geo.clear()

csv_path = node.parm("csv_file").eval()

with open(csv_path, "r") as f:
 reader = csv.DictReader(f)
 for row in reader:
 pt = geo.createPoint()
 pt.setPosition(hou.Vector3(
 float(row["x"]),
 float(row["y"]),
 float(row["z"])
 ))

 # Transfer any extra columns as attributes
 if "name" in row:
 if geo.findPointAttrib("name") is None:
 geo.addAttrib(hou.attribType.Point, "name", "")
 pt.setAttribValue("name", row["name"])

 if "scale" in row:
 if geo.findPointAttrib("pscale") is None:
 geo.addAttrib(hou.attribType.Point, "pscale", 1.0)
pt.setAttribValue("pscale", float(row["scale"]))# Python SOP - read JSON config and set detail attributes
import json
node = hou.pwd()
geo = node.geometry()
json_path = node.parm("config_path").eval()
with open(json_path, "r") as f:
config = json.load(f)
# Store each config value as a detail attribute
for key, value in config.items():
if isinstance(value, (int, float)):
geo.addAttrib(hou.attribType.Global, key, value)
geo.setGlobalAttribValue(key, value)
elif isinstance(value, str):
geo.addAttrib(hou.attribType.Global, key, "")
geo.setGlobalAttribValue(key, value)
elif isinstance(value, list) and len(value) == 3:
geo.addAttrib(hou.attribType.Global, key, hou.Vector3())
geo.setGlobalAttribValue(key, hou.Vector3(value))// Read the JSON-loaded detail attributes downstream in VEX float grid_size = detail(0, "grid_size"); string biome = detail(0, "biome_type"); int seed = detail(0, "random_seed"); // Use config values to drive generation float freq = grid_size * 0.1; @P.y = snoise(@P * freq + seed) * detail(0, "height_scale");
Once other people depend on a setup, the boring habits become the important ones:
// Quality switch pattern - use in a Switch SOP expression
// Switch input 0 = low-res, input 1 = high-res
// Expression on Switch: ch("../CTRL_settings/high_quality")

// Low-res wrangle: reduce density for fast iteration
f@density *= 0.1;
i@subdivisions = 1;

// High-res wrangle: full quality settings
f@density *= 1.0;
i@subdivisions = chi("../CTRL_settings/subdiv_level");Create a CTRL_settings null near the top with the global controls: quality, seed, output path, density, whatever matters. Reference it from the rest of the graph. Artists get one dashboard instead of a treasure hunt.
If these patterns make sense, go deeper into VEX for the per-point logic, or Python in Houdini for shelf tools, exports, and pipeline glue.